1.Compressing your JavaScript with Closure Compiler
Overview
The best way to make your web page more responsive is to minimize the number of files and size of files that must be downloaded when the page is loaded. Reducing the number of files loaded avoids hitting maximum simultaneous download limits in browsers. Reducing file size cuts the time needed to send all the bytes over the Internet. Some tools already exist to minimize files and file sizes. Spriting tools and image compression tools let you minimize the number and size of images; gzip and HTML compression tools let you reduce the size of your HTML files.JavaScript minimization tools give you another way to reduce your overall download size. These tools work on JavaScript source code for your webpage. The tools remove unneeded spaces and comments, and sometimes even change the names of variables in your program to shrink the file size even more. However, the commonly used minimization tools miss additional ways to compress the code even further.
The Closure Compiler, a new minimization tool, finds ways to compress your JavaScript code even further than existing minimization tools. It achieves additional compression by using compiler-like technology to rewrite your JavaScript into a much smaller form, while ensuring the code still runs correctly. Closure Compiler can condense several files into one single file, and can easily reduce the size of your JavaScript in half. The Closure Compiler also does syntactic checks and static analysis for your program, so it flags potential syntax and type errors and highlights code patterns that may not work well on all browsers.
Example: What Can Closure Compiler Do For You?
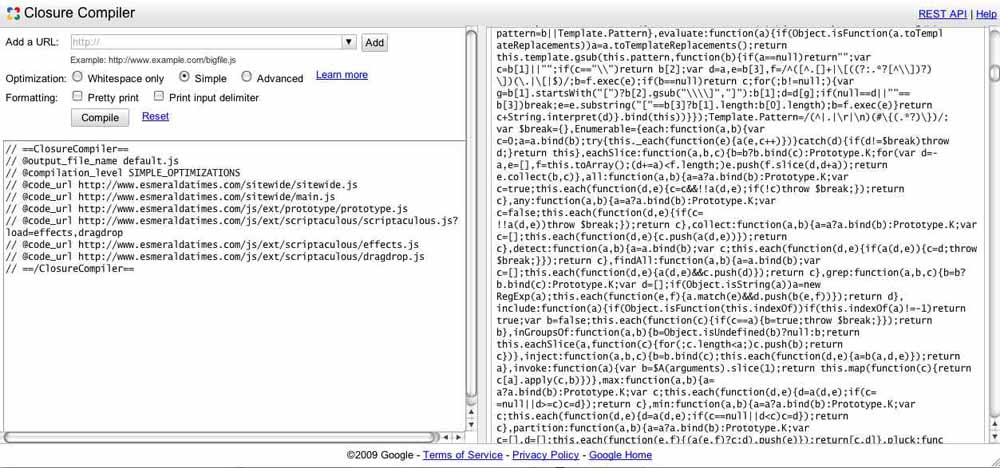
As a starting example, imagine you're a web developer for a large newspaper, the Esmeralda Times, and you want to try optimizing the code for your home page. Go to the Closure Compiler web service UI at http://closure-compiler.appspot.com. Notice that the web application starts off with a simple Hello World example; if you click "Compile", Closure Compiler minimizes the code and shows it on the right hand side.But you don't care about "Hello World"; you care about speeding up your web page.
Our fictional example here (borrowed from an actual media website) loads six separate JavaScript files when loading the home page, for a total of about 227,000 bytes of code. Two of the files represent the Esmeralda Times's own code, and the rest uses the Prototype and script.aculo.us JavaScript libraries.
Click the "Reset" link to delete the "Hello World" portion of the code in the Closure Compiler web service UI. Add the URLs for the JavaScript files in your home page, either by typing a URL into the text field and pressing "Add", or by typing these explicit requests to load specific pages into the input section of the Closure Compiler web service:
// ==ClosureCompiler==
// @output_file_name default.js
// @compilation_level ADVANCED_OPTIMIZATIONS
// @code_url http://www.esmeraldatimes.com/sitewide/sitewide.js
// @code_url http://www.esmeraldatimes.com/sitewide/main.js
// @code_url http://www.esmeraldatimes.com/js/ext/prototype/prototype.js
// @code_url http://www.esmeraldatimes.com/js/ext/scriptaculous/scriptaculous.js?load=effects,dragdrop
// @code_url http://www.esmeraldatimes.com/js/ext/scriptaculous/effects.js
// @code_url http://www.esmeraldatimes.com/js/ext/scriptaculous/dragdrop.js
// ==/ClosureCompiler==
Now, choose a compile mode. You have these choices:
- Whitespace Only mode simply removes unnecessary whitespace and comments. Selecting "Whitespace Only" mode and pressing compile presents you with a single file of JavaScript with 164K of source code, 28% smaller than the original 227K of source code.
- Simple mode is a bit more sophisticated. It optimizes JavaScript function bodies in several ways, including renaming local variables, removing unneeded variables and code, and replacing constant expressions with their final value (such as converting "1+3" to "4"). It, however, won't remove any functions or variables that might be referenced outside your JavaScript. It shrinks the code by 42% from 227K to 132K
- Advanced mode does even more sophisticated changes to your code. Try selecting "Advanced" optimizations, compile the code, and look at the results. This code looks much less like your original code; it renames all functions to short names, deletes functions it does not believe are used, replaces some function calls with the function body, and does several other optimizations that shrinks the code even further. Typically, you can't use Advanced Mode on existing JavaScript code without providing some additional information about functions in the code that need to be visible elsewhere and code elsewhere that might be called from within your JavaScript. However, it's worth noting that the Advanced mode cut the code size from 227K to 86K - 62% smaller than the original code. If you'd like this file to load in 1/3 the time of the original, you might find it worthwhile to give Advanced mode all the information to do this change correctly.
Best of all, you can still debug this compressed code by generating a Closure Inspector source map. The Firebug debugger uses this source map to point you to the lines of original source code that correspond to the optimized code that you're debugging. Generating the Closure Inspector source maps requires running the Closure Compiler on your local machine using the source or pre-built jar files.
Now you've seen what the Closure Compiler can do for the Esmeralda Times; go look at the JavaScript brought in by your own web application, and see what it can do for your actual code!
What Else Can Closure Compiler Do For You?
The Closure Compiler can also warn you about incorrect code. Because it is parsing your JavaScript code, it can warn you about compile errors without requiring you to load the code into your browser. You can be sure you have no syntax errors that will mysteriously appear when you click on an infrequently-used button. The Closure Compiler also can identify common code patterns that are not consistently handled in all browsers, such as trailing commas in arrays (a = [1, 2, 3, ];)
Some browsers create three elements in the array, others four; such
inconsistencies can create some hard-to-track down bugs. Closure
Compiler can also identify invalid math operations, code that can never
be executed, or function calls where you're not passing enough
arguments.In Advanced Mode, Closure Compiler can also use type annotations in your code to find logic errors in your program - cases where you intend to pass a
Money object, but accidentally pass an AccountNumber
object, for example. This gives you the bug-finding advantages of typed
languages like Java, but still keeps the fast, fun coding experience of
JavaScript.How Does Closure Compiler Work?
Closure Compiler is actually a JavaScript compiler, but rather than generating machine code like most compilers, it produces valid JavaScript code. It can rewrite JavaScript code in many interesting ways. It can identify constant expressions and replace them with constant values, replacing(15 * 280) + 16 with 4216.
By doing this, it cuts 15 characters to 5. More importantly, it gives
you the freedom to write your code in a clear and understandable way,
and frees you from worrying about the final size of the code. Functions
called in only one or two places can be inlined, replacing the function
call with the contents of the function body, saving the space needed for
the function declaration. Closure Compiler can even tell when two
different variables are never used at the same time, letting both share
the same name and ensuring that as many variables as possible use very
short names for better gzip compression.Closure Compiler is open-source; examine or download the source at http://code.google.com/closure/compiler/ to build it yourself and write your own JavaScript code optimizations!
Conclusion
Closure Compiler gives JavaScript developers a new and better way to compress JavaScript code, and helps your web pages using JavaScript load faster than ever. Try it out on your JavaScript sources, and see what a difference it can mak2.Speeding up JavaScript: Working with the DOM
When
working with Rich Internet Applications, we write JavaScript that
updates the page by changing elements or adding new ones. This is done
by working with the DOM, or Document Object Model, and how we do this
can affect the speed of our applications.
Working with the DOM can cause browser reflow, which is the browser's process of determining how things should be displayed. Directly manipulating the DOM, changing CSS styles of elements, and resizing the browser window can all trigger a reflow. Accessing an element's layout properties such as offsetHeight and offsetWidth can also trigger a reflow. Because each reflow takes time, the more we can minimise browser reflow, the faster our applications will be.
When working with the DOM we either manipulate existing elements on the page or generate new ones. The four patterns below cover both DOM manipulation and DOM generation and help reduce the amount of reflows triggered in the browser.
Working with the DOM can cause browser reflow, which is the browser's process of determining how things should be displayed. Directly manipulating the DOM, changing CSS styles of elements, and resizing the browser window can all trigger a reflow. Accessing an element's layout properties such as offsetHeight and offsetWidth can also trigger a reflow. Because each reflow takes time, the more we can minimise browser reflow, the faster our applications will be.
When working with the DOM we either manipulate existing elements on the page or generate new ones. The four patterns below cover both DOM manipulation and DOM generation and help reduce the amount of reflows triggered in the browser.
CSS class switching DOM manipulation
This pattern lets us change multiple style properties of an element and its descendants, triggering a single reflow.The problem
Let's make a function that changes the className attribute for all anchors within an element. We could do this by simply iterating through each anchor and updating their className attributes. The problems is, this can cause a reflow for each anchor.function selectAnchor(element) {
element.style.fontWeight = 'bold';
element.style.textDecoration = 'none';
element.style.color = '#000';
}
The solution
To solve this problem we can create a class that sets all these style properties. Now we just trigger a single browser reflow by adding this class to our element. We also separate presentation from behaviour with this pattern..selectedAnchor {
font-weight: bold;
text-decoration: none;
color: #000;
}
function selectAnchor(element) {
element.className = 'selectedAnchor';
}
Out-of-the-flow DOM Manipulation
This pattern lets us create multiple elements and insert them into the DOM triggering a single reflow. It uses something called a DocumentFragment. We create a DocumentFragment outside of the DOM (so it is out-of-the-flow). We then create and add multiple elements to this. Finally, we move all elements in the DocumentFragment to the DOM but trigger a single reflow.The problem
Let's make a function that changes the className attribute for all anchors within an element. We could do this by simply iterating through each anchor and updating their href attributes. The problems is, this can cause a reflow for each anchor.function updateAllAnchors(element, anchorClass) {
var anchors = element.getElementsByTagName('a');
for (var i = 0, length = anchors.length; i < length; i ++) {
anchors[i].className = anchorClass;
}
}
The solution
To solve this problem, we can remove the element from the DOM, update all anchors, and then insert the element back where it was. To help achieve this, we can write a reusable function that not only removes an element from the DOM, but also returns a function that will insert the element back into its original position./**
* Remove an element and provide a function that inserts it into its original position
* @param element {Element} The element to be temporarily removed
* @return {Function} A function that inserts the element into its original position
**/
function removeToInsertLater(element) {
var parentNode = element.parentNode;
var nextSibling = element.nextSibling;
parentNode.removeChild(element);
return function() {
if (nextSibling) {
parentNode.insertBefore(element, nextSibling);
} else {
parentNode.appendChild(element);
}
};
}
Now we can use this function to update the anchors within an
element that is out-of-the-flow, and only trigger a reflow when we
remove the element and when we insert the element.function updateAllAnchors(element, anchorClass) {
var insertFunction = removeToInsertLater(element);
var anchors = element.getElementsByTagName('a');
for (var i = 0, length = anchors.length; i < length; i ++) {
anchors[i].className = anchorClass;
}
insertFunction();
}
Single Element DOM Generation
This pattern lets us create and add a single element to the DOM triggering a single reflow. After creating the element, make all changes to the new element before adding it to the DOM.The problem
Let's make a function that adds a new anchor element to a parent element. The function lets you provide the class and text for the anchor. We could do this by creating the element, adding it do the DOM, and then setting these properties. This can trigger 3 reflows.function addAnchor(parentElement, anchorText, anchorClass) {
var element = document.createElement('a');
parentElement.appendChild(element);
element.innerHTML = anchorText;
element.className = anchorClass;
}
The solution
To solve this, we insert the child into the DOM last. This triggers one reflow.function addAnchor(parentElement, anchorText, anchorClass) {
var element = document.createElement('a');
element.innerHTML = anchorText;
element.className = anchorClass;
parentElement.appendChild(element);
}
However, we have a problem if we decide we want to add a large
number of anchors to an element. With this approach, each time we add a
anchor it could trigger a reflow. The next pattern resolves this
problem.DocumentFragment DOM Generation
This pattern lets us create multiple elements and insert them into the DOM triggering a single reflow. It uses something called a DocumentFragment. We create a DocumentFragment outside of the DOM (so it is out-of-the-flow). We then create and add multiple elements to this. Finally, we move all elements in the DocumentFragment to DOM but trigger a single reflow.The problem
Let's make a function that adds 10 anchors to an element. If we simply appended each new anchor directly to the element, we could trigger 10 reflows.function addAnchors(element) {
var anchor;
for (var i = 0; i < 10; i ++) {
anchor = document.createElement('a');
anchor.innerHTML = 'test';
element.appendChild(anchor);
}
}
The solution
To solve this problem, we create a DocumentFragment and append each new anchor to this. When we append the DocumentFragment to the element using appendChild, all the children of the DocumentFragment are actually appended to the element. This triggers a single reflow.function addAnchors(element) {
var anchor, fragment = document.createDocumentFragment();
for (var i = 0; i < 10; i ++) {
anchor = document.createElement('a');
anchor.innerHTML = 'test';
fragment.appendChild(anchor);
}
element.appendChild(fragment);
}
3.CSS: Using every declaration just once
A
logical way to make your website faster is to make the client code you
send to the browser smaller. When looking to optimize your CSS files,
one of the most powerful measures you can employ is to use every
declaration just once.Using every declaration just once means making
strict use of selector grouping.For example, you can combine these rules:
Let's have a look at another example:
There are some things to keep in mind when applying this method:
One way, for instance, is to mark rules you edited or added by indenting them. Once you're done updating your stylesheet, you can check for the indented rules to see if there are any new duplicate declarations, which you could then move to make sure each one of them is only used once.
4.Optimizing JavaScript codeh1 { color: black; }
p { color: black; }into a single rule:h1, p { color: black; }While
this simple example appears obvious, things are getting more
interesting and harder to quantify when talking about complex style
sheets. In our experience, using every declaration just once can reduce
the CSS file size by 20-40% on average.Let's have a look at another example:
h1, h2, h3 { font-weight: normal; }
 a strong { font-weight: normal !important; }
 strong { font-style: italic; font-weight: normal; }
 #nav { font-style: italic; }
 .note { font-style: italic; }
Applying the "any declaration just once" rule here results in:h1, h2, h3, strong { font-weight: normal; }
a strong { font-weight: normal !important; }
strong, #nav, .note { font-style: italic; }Note that the !important declaration makes a difference.There are some things to keep in mind when applying this method:
- First, overly long selectors can render this method useless. Repeating selectors like
html body table tbody tr td p span.examplein order to have unique declarations doesn't save much file size. In fact, since "using every declaration just once" might mean a higher number of selectors, this could even result in a bigger style sheet. Using more compact selectors would help, and would enhance the readability of your stylesheet. - Second, be aware of CSS regulations. When a user agent can't parse the selector, it must ignore the declaration block as well. If you run into trouble with this, just bend the "declaration just once" rule – and use it more than once.
- Third, and most importantly, keep the cascade in mind. No matter if you're sorting your style sheets in a certain way or are very relaxed about the order in which rules appear in your style sheets, using every declaration once will make you change the order of the rules in one way or another. This order, however, can be decisive for a browser to decide which rule to apply. The easiest solution if you're running into any issues with this is to make an exception as well and use the declaration in question more than once.
Workflow
"Using every declaration just once" requires more attention when maintaining stylesheets. You will benefit from finding a way to track changed and added declarations to get them in line again. This is not hard when using a more or less reasonable editor (showing line changes, for example), but needs to be incorporated into the workflow.One way, for instance, is to mark rules you edited or added by indenting them. Once you're done updating your stylesheet, you can check for the indented rules to see if there are any new duplicate declarations, which you could then move to make sure each one of them is only used once.
Client-side
scripting can make your application dynamic and active, but the
browser's interpretation of this code can itself introduce
inefficiencies, and the performance of different constructs varies from
client to client. Here we discuss a few tips and best practices to
optimize your JavaScript code.
Consider this example:
For example, assuming
baz.Bar.prototype.foo = function() {
// method body
};With this approach, no matter how many instances of
For example, instead of:
foo.Bar.prototype.prop1_ = 4;
foo.Bar.prototype.prop2_ = true;
foo.Bar.prototype.prop4_ = 'blah';
Avoiding
Avoid using
Here are some rules of thumb for avoiding memory leaks:
In addition, using inline event handlers can lead to another kind of leak in IE. This is not the common circular reference type leak, but rather a leak of an internal temporary anonymous script object. For details, see the section on "DOM Insertion Order Leak Model" in Understanding and Solving Internet Explorer Leak Patterns and and an example in this JavaScript Kit tutorial.
Working with strings
String concatenation causes major problems with Internet Explorer 6 and 7 garbage collection performance. Although these issues have been addressed in Internet Explorer 8 -- concatenating is actually slightly more efficient on IE8 and other non-IE browsers such as Chrome -- if a significant portion of your user population uses Internet Explorer 6 or 7, you should pay serious attention to the way you build your strings.Consider this example:
var veryLongMessage =
 'This is a long string that due to our strict line length limit of' +
 maxCharsPerLine +
 ' characters per line must be wrapped. ' +
 percentWhoDislike +
 '% of engineers dislike this rule. The line length limit is for ' +
 ' style purposes, but we don't want it to have a performance impact.' +
 ' So the question is how should we do the wrapping?';
Instead of concatenation, try using a join:var veryLongMessage =
['This is a long string that due to our strict line length limit of',
maxCharsPerLine,
' characters per line must be wrapped. ',
percentWhoDislike,
'% of engineers dislike this rule. The line length limit is for ',
' style purposes, but we don't want it to have a performance impact.',
' So the question is how should we do the wrapping?'
].join();Similarly,
building up a string across conditional statements and/or loops by
using concatenation can be very inefficient. The wrong way:var fibonacciStr = 'First 20 Fibonacci Numbers
';
for (var i = 0; i < 20; i++) {
fibonacciStr += i + ' = ' + fibonacci(i) + '
';
}The right way:var strBuilder = ['First 20 fibonacci numbers:'];
for (var i = 0; i < 20; i++) {
strBuilder.push(i, ' = ', fibonacci(i));
}
var fibonacciStr = strBuilder.join('');Building strings with portions coming from helper functions
Build up long strings by passing string builders (either an array or a helper class) into functions, to avoid temporary result strings.For example, assuming
buildMenuItemHtml_ needs to build up a string from literals and variables and would use a string builder internally, instead of using:var strBuilder = [];
for (var i = 0, length = menuItems.length; i < length; i++) {
strBuilder.push(this.buildMenuItemHtml_(menuItems[i]));
}
var menuHtml = strBuilder.join();Use:var strBuilder = [];
for (var i = 0, length = menuItems.length; i < length; i++) {
this.buildMenuItem_(menuItems[i], strBuilder);
}
var menuHtml = strBuilder.join();Defining class methods
The following is inefficient, as each time a instance ofbaz.Bar is constructed, a new function and closure is created for foo:baz.Bar = function() {
// constructor body
this.foo = function() {
// method body
};
}The preferred approach is:baz.Bar = function() {
// constructor body
};baz.Bar.prototype.foo = function() {
// method body
};With this approach, no matter how many instances of
baz.Bar are constructed, only a single function is ever created for foo, and no closures are created.Initializing instance variables
Place instance variable declaration/initialization on the prototype for instance variables with value type (rather than reference type) initialization values (i.e. values of type number, Boolean, null, undefined, or string). This avoids unnecessarily running the initialization code each time the constructor is called. (This can't be done for instance variables whose initial value is dependent on arguments to the constructor, or some other state at time of construction.)For example, instead of:
foo.Bar = function() {
 this.prop1_ = 4;
 this.prop2_ = true;
 this.prop3_ = [];
 this.prop4_ = 'blah';
};Use:foo.Bar = function() {
this.prop3_ = [];
};foo.Bar.prototype.prop1_ = 4;
foo.Bar.prototype.prop2_ = true;
foo.Bar.prototype.prop4_ = 'blah';
Avoiding pitfalls with closures
Closures are a powerful and useful feature of JavaScript; however, they have several drawbacks, including:- They are the most common source of memory leaks.
- Creating
a closure is significantly slower then creating an inner function
without a closure, and much slower than reusing a static function. For
example:
function setupAlertTimeout() {is slower than:
var msg = 'Message to alert';
window.setTimeout(function() { alert(msg); }, 100);
}
function setupAlertTimeout() {which is slower than:
window.setTimeout(function() {
var msg = 'Message to alert';
alert(msg);
}, 100);
}
function alertMsg() {
 var msg = 'Message to alert';
 alert(msg);
 }
function setupAlertTimeout() {
window.setTimeout(alertMsg, 100);
} - They
add a level to the scope chain. When the browser resolves properties,
each level of the scope chain must be checked. In the following example:
var a = 'a';
function createFunctionWithClosure() {
var b = 'b';
return function () {
var c = 'c';
a;
b;
c;
};
}
var f = createFunctionWithClosure();
f();whenfis invoked, referencingais slower than referencingb, which is slower than referencingc.
Avoiding with
Avoid using with
in your code. It has a negative impact on performance, as it modifies
the scope chain, making it more expensive to look up variables in other
scopes.Avoiding browser memory leaks
Memory leaks are an all too common problem with web applications, and can result in huge performance hits. As the memory usage of the browser grows, your web application, along with the rest of the user's system, slows down. The most common memory leaks for web applications involve circular references between the JavaScript script engine and the browsers' C++ objects' implementing the DOM (e.g. between the JavaScript script engine and Internet Explorer's COM infrastructure, or between the JavaScript engine and Firefox XPCOM infrastructure).Here are some rules of thumb for avoiding memory leaks:
Use an event system for attaching event handlers
The most common circular reference pattern [ DOM element --> event handler --> closure scope --> DOM ] element is discussed in this MSDN blog post. To avoid this problem, use one of the well-tested event systems for attaching event handlers, such as those in Google doctype, Dojo, or JQuery.In addition, using inline event handlers can lead to another kind of leak in IE. This is not the common circular reference type leak, but rather a leak of an internal temporary anonymous script object. For details, see the section on "DOM Insertion Order Leak Model" in Understanding and Solving Internet Explorer Leak Patterns and and an example in this JavaScript Kit tutorial.
Avoid expando properties
Expando properties are arbitrary JavaScript properties on DOM elements and are a common source of circular references. You can use expando properties without introducing memory leaks, but it is pretty easy to introduce one by accident. The leak pattern here is [ DOM element --> via expando--> intermediary object --> DOM element ]. The best thing to do is to just avoid using them. If you do use them, only use values with primitive types. If you do use non-primitive values, nullify the expando property when it is no longer needed. See the section on "Circular References" in Understanding and Solving Internet Explorer Leak Patterns.5.Prefetching resources
Web
pages that require large files can often benefit from changing the
order that those files are requested. In some cases, it makes sense to
download files before they are necessary, so that they are instantly
available once requested. When the resources required for a page can be
loaded in advance, the user-perceived network latency for that page can
be significantly reduced or even eliminated.For interactive websites,
optimizing speed requires more than just minimizing the initial download
size. For any site where user interactions can download additional
resources, the speed of those actions depends on how long it takes for
those resources to download. The site can be made faster by making the
downloads smaller, but additional speedups may be possible by making the
downloads sooner.
This technique has the potential to speed up many interactive sites, but won't work everywhere. For some sites, it's just too difficult to guess what the user might do next. For others, the data might get stale if it's fetched too soon. It's also important to be careful not to prefetch files too soon, or you can slow down the page the user is already looking at. Prefetching too much will also leave a bad impression, as the user won't appreciate having their network clogged up.
Here are a few things to consider when designing prefetching for your own site:
7.SPDY Performance on Mobile Networks
[youtube https://www.youtube.com/watch?v=8poT-9XzCb4&hl=en&fs=1&]
"Prefetching"
is simply loading a file before it's needed. It's common on interactive
sites for a user action to download of additional data, such as feeds
or images. If it's possible to predict the next user action, then it may
be possible to start the downloads before the user input is made. For
example, when you look at a photo on Picasa Web Albums, we make a guess
that you'll look at the next photo as well, and start downloading it as
soon as possible. Sometimes we download a photo that the user won't
actually look at, but that's worth it when we can make the rest of the
photos show up faster.This technique has the potential to speed up many interactive sites, but won't work everywhere. For some sites, it's just too difficult to guess what the user might do next. For others, the data might get stale if it's fetched too soon. It's also important to be careful not to prefetch files too soon, or you can slow down the page the user is already looking at. Prefetching too much will also leave a bad impression, as the user won't appreciate having their network clogged up.
Here are a few things to consider when designing prefetching for your own site:
Study user actions
If your users spend most of their time on one particular page or action, then that's the one to optimize. You can figure this out by looking through server logs, or just by watching a few volunteers use your site. For Picasa Web Albums, we know that the most common action is navigating from one photo to the next, and that was an excellent candidate for prefetching.Measure when the page is ready
You shouldn't start fetching data for a new page before the current page is done. For very dynamic pages, you may have to add JavaScript onload handlers for each external file on the page. Once those resources are safely downloaded, it's reasonable to start prefetching files for the next user action.Prefetch the right data
Some data is safer to prefetch than others. Images tend to be long-lived, and cache very well in the browser. Many data feeds are safe to prefetch, while others may be too time sensitive (for example, a feed of recent updates), or too frequently modified by user actions to be good prefetching candidates.Profile your changes
Use profiling tools like Page Speed to get speed measurements before and after your change. Make sure that you're not making the rest of your site slower by requesting too much data at once. Use those tools to tune how much and how frequently you prefetch, based on how much user time you save compared to how much network bandwidth you use.Be a good web citizen
Your users probably have other websites open in different tabs or windows, so don't hog all of their bandwidth. A modest amount of prefetching will make your site feel fast and make your users happy; too much will bog down the network and make your users sad. Prefetching only works when the extra data is actually used, so don't use the bandwidth if it's likely to get wasted.6.Minimizing browser reflow
Author: Lindsey Simon, UX Developer
Recommended knowledge: Basic HTML, basic Javascript, working knowledge of CSS
Reflow is the name of the web browser process for re-calculating the positions and geometries of elements in the document, for the purpose of re-rendering part or all of the document. Because reflow is a user-blocking operation in the browser, it is useful for developers to understand how to improve reflow time and also to understand the effects of various document properties (DOM depth, CSS rule efficiency, different types of style changes) on reflow time. Sometimes reflowing a single element in the document may require reflowing its parent elements and also any elements which follow it.
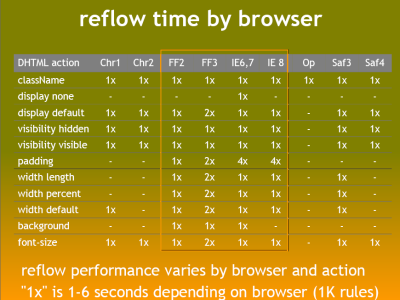
There are a great variety of user actions and possible DHTML changes that can trigger a reflow. Resizing the browser window, using JavaScript methods involving computed styles, adding or removing elements from the DOM, and changing an element's classes are a few of the things that can trigger reflow. It's also worth noting that some operations may cause more reflow time than you might have imagined - consider the following diagram from Steve Souders' talk "Even Faster Web Sites":
 From
the table above it's clear that not all changes to the style in
JavaScript cause a reflow in all browsers, and that the time it takes to
reflow varies. It is also somewhat clear that modern browsers are
getting better at reflow times.
From
the table above it's clear that not all changes to the style in
JavaScript cause a reflow in all browsers, and that the time it takes to
reflow varies. It is also somewhat clear that modern browsers are
getting better at reflow times.
At Google, we test the speed of our web pages and applications in a variety of ways - and reflow is a key factor we consider when adding features to our UIs. We strive to deliver lively, interactive and delightful user experiences.
Recommended knowledge: Basic HTML, basic Javascript, working knowledge of CSS
Reflow is the name of the web browser process for re-calculating the positions and geometries of elements in the document, for the purpose of re-rendering part or all of the document. Because reflow is a user-blocking operation in the browser, it is useful for developers to understand how to improve reflow time and also to understand the effects of various document properties (DOM depth, CSS rule efficiency, different types of style changes) on reflow time. Sometimes reflowing a single element in the document may require reflowing its parent elements and also any elements which follow it.
There are a great variety of user actions and possible DHTML changes that can trigger a reflow. Resizing the browser window, using JavaScript methods involving computed styles, adding or removing elements from the DOM, and changing an element's classes are a few of the things that can trigger reflow. It's also worth noting that some operations may cause more reflow time than you might have imagined - consider the following diagram from Steve Souders' talk "Even Faster Web Sites":
From
the table above it's clear that not all changes to the style in
JavaScript cause a reflow in all browsers, and that the time it takes to
reflow varies. It is also somewhat clear that modern browsers are
getting better at reflow times.At Google, we test the speed of our web pages and applications in a variety of ways - and reflow is a key factor we consider when adding features to our UIs. We strive to deliver lively, interactive and delightful user experiences.
Guidelines
Here are some easy guidelines to help you minimize reflow in your web pages:- Reduce unnecessary DOM depth. Changes at one level in the DOM tree can cause changes at every level of the tree - all the way up to the root, and all the the way down into the children of the modified node. This leads to more time being spent performing reflow.
- Minimize CSS rules, and remove unused CSS rules.
- If you make complex rendering changes such as animations, do so out of the flow. Use position-absolute or position-fixed to accomplish this.
- Avoid unnecessary complex CSS selectors - descendant selectors in particular - which require more CPU power to do selector matching.
[youtube https://www.youtube.com/watch?v=ZHxbs5WEQzE&hl=en&fs=1&]
Additional resources
- Mozilla's Notes on HTML reflow
- Opera's Repaints and reflows
- Satoshi Ueyama's debug-Firefox reflow demos:
- Nicole Sullivan on Reflows and Repaints
Authors: Matt Welsh, Ben Greenstein, and Michael Piatek, Mobile Web Performance team
April 30, 2012
SPDY is a replacement for HTTP, designed to speed up transfers of web pages, by eliminating much of the overhead associated with HTTP. SPDY supports out-of-order responses, header compression, server-side push, and other optimizations that give it an edge over HTTP when it comes to speed. SPDY is gaining a great deal of traction -- it has been implemented in Chrome, Firefox, and Amazon Silk, been deployed widely by Google, and there is now SPDY support for Apache through the mod_spdy module.
SPDY's design should help performance on mobile networks, which experience high round-trip times and typically lower throughput than to wired networks. SPDY includes several features that should improve web page download speeds on mobile networks, including:
The net result is that using SPDY results in a mean page load time improvement of 23% across these sites, compared to HTTP. This is equivalent to a speedup of 1.3x for SPDY over HTTP. Much more work can be done to improve SPDY performance on 3G and 4G cellular networks, but this is a promising start. More details below.

We ran two sets of experiments:
Table 1: Domains included in the Web page measurements
Figure 2: Comparison of SPDY vs. HTTP page load times
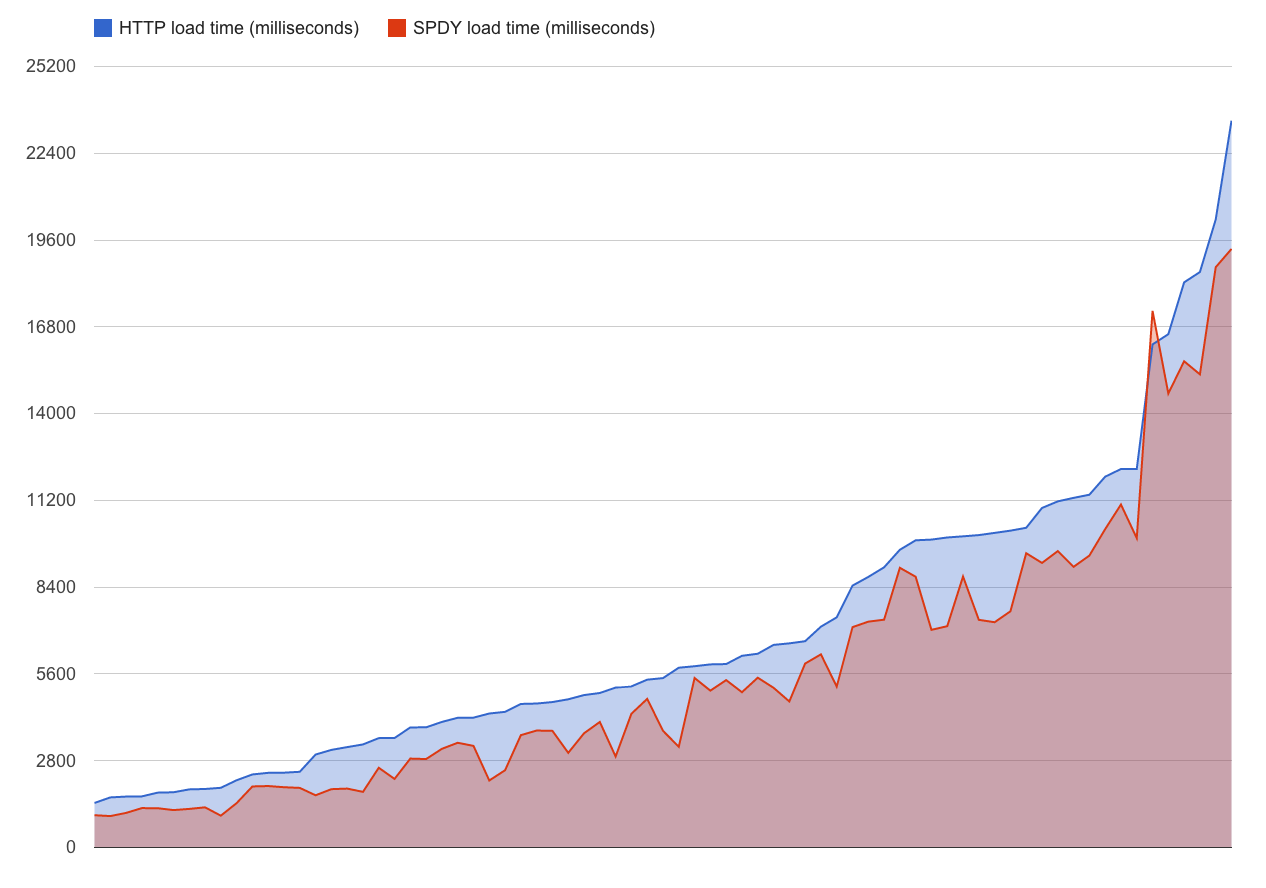
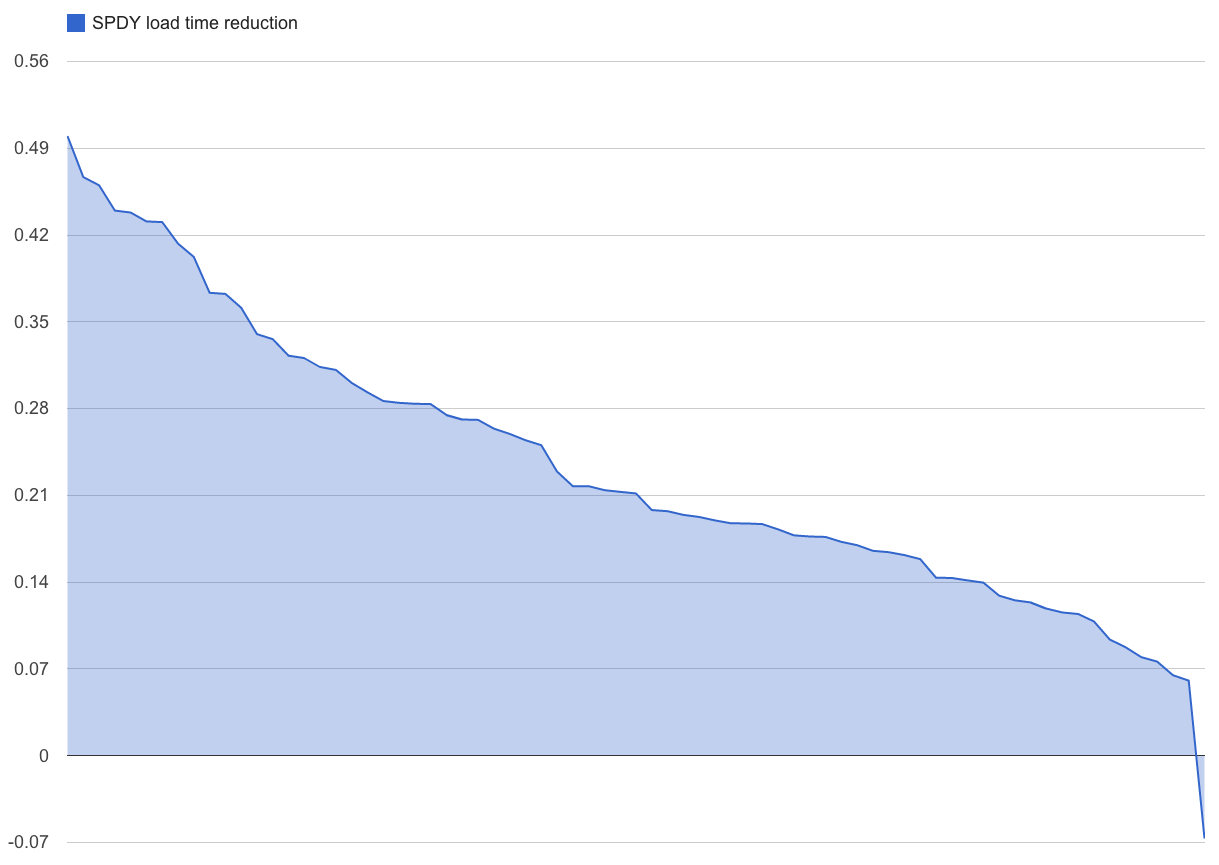
Figure 3 shows the average SPDY load time reduction for each of the measured pages. The load time reduction is calculated as (SPDY load time) / (HTTP load time) for each page.
Figure 3: Page load time reduction for SPDY for each of the measured sites
In order to take a closer look at SPDY's performance, Figures 4 and 5 show the waterfall chart for SPDY and HTTP (respectively) for one of the pages.
Figure 4: SPDY load waterfall for http://en.m.wikipedia.org/wiki/Harvard_University
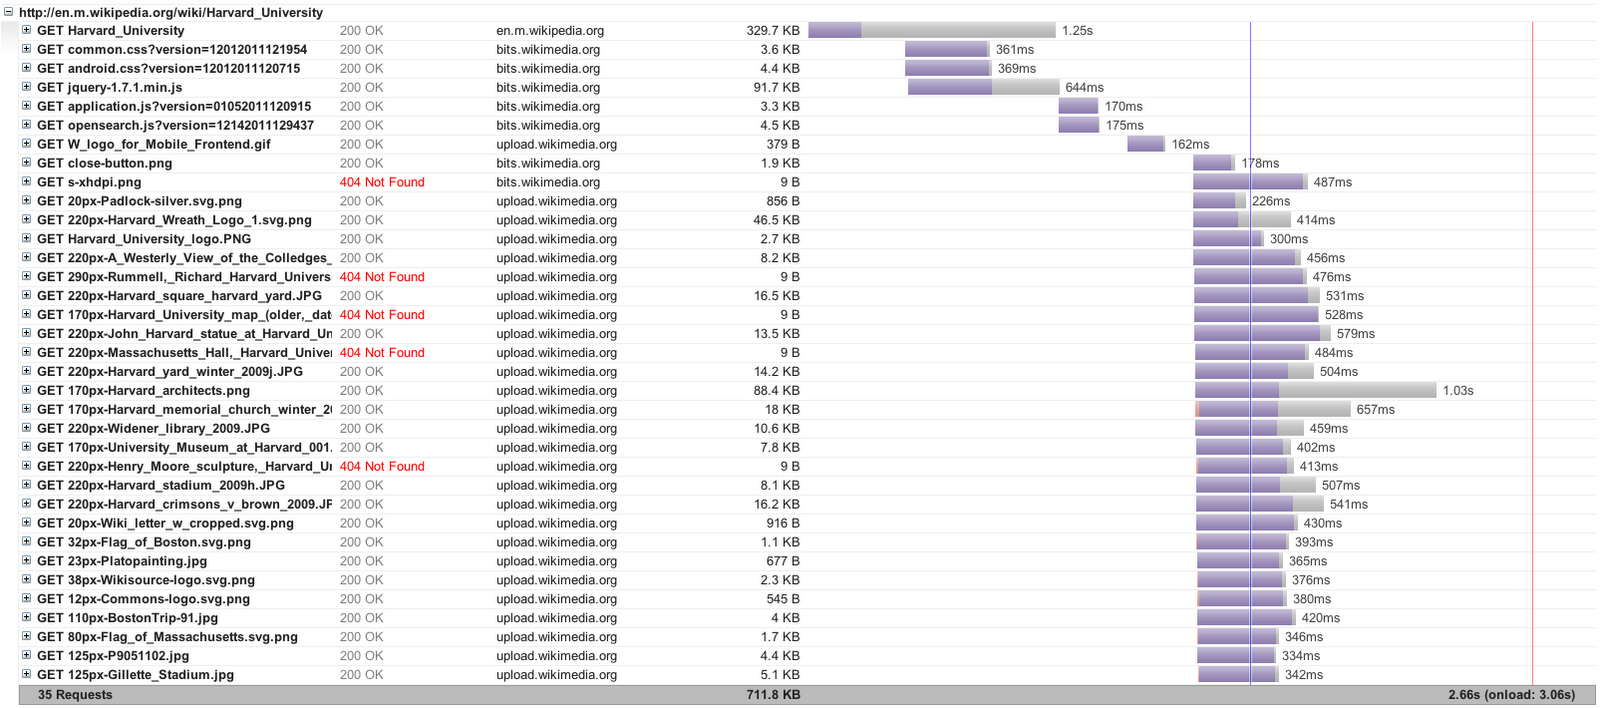
Figure 5: HTTP load waterfall for http://en.m.wikipedia.org/wiki/Harvard_University
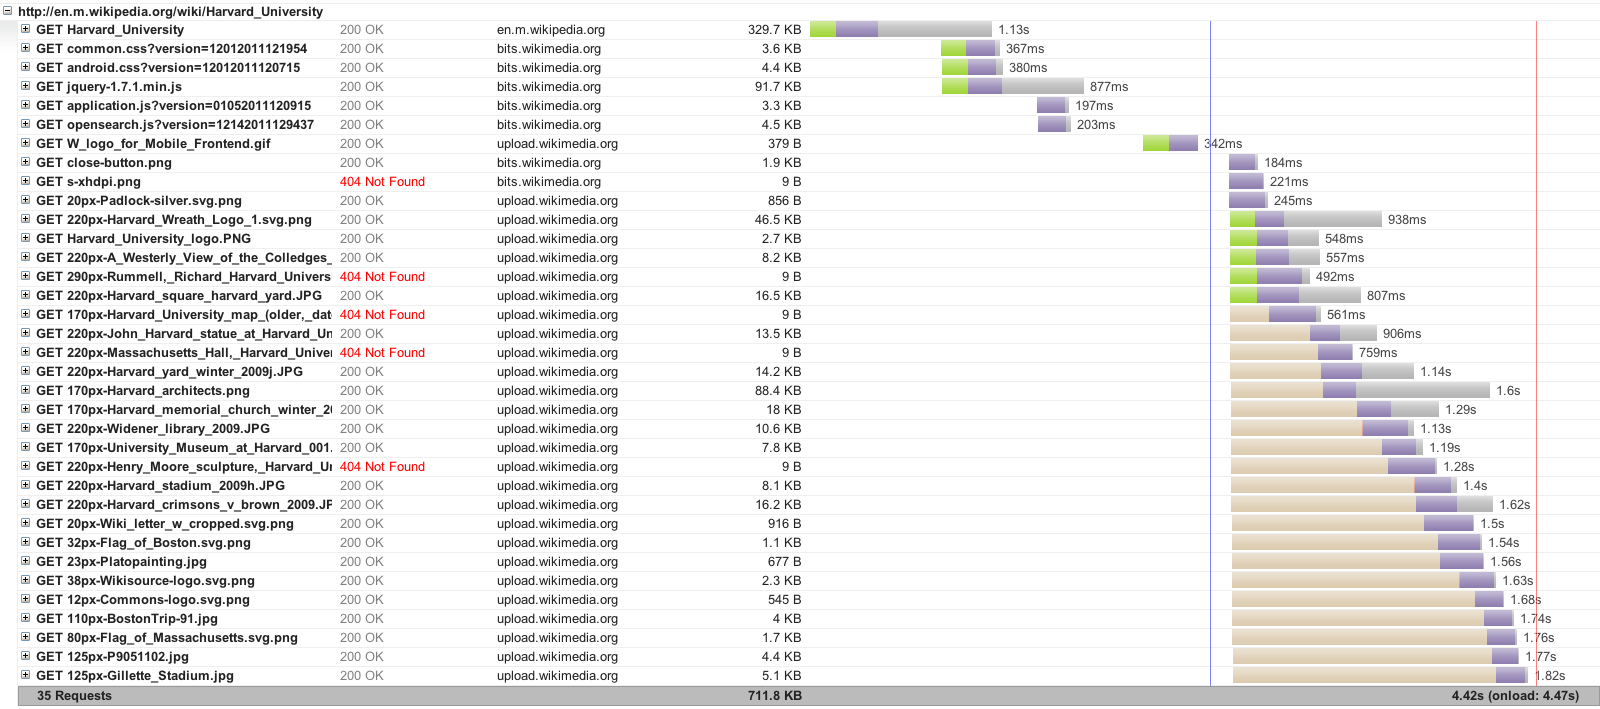
The waterfall diagrams clearly show SPDY's main advantage over HTTP: The use of out-of-order responses. In the SPDY case, the browser opens a number of SPDY streams (over the same TCP connection) to fetch the various resources on the page, whereas in HTTP, each of the resources are fetched across several (6 in this case) TCP connections, with each connection handling requests in a FIFO fashion. Note that there are several 404 Not Found errors in both traces, owing to the Web Page Replay setup not caching all of the resources on the page.
8
April 30, 2012
SPDY is a replacement for HTTP, designed to speed up transfers of web pages, by eliminating much of the overhead associated with HTTP. SPDY supports out-of-order responses, header compression, server-side push, and other optimizations that give it an edge over HTTP when it comes to speed. SPDY is gaining a great deal of traction -- it has been implemented in Chrome, Firefox, and Amazon Silk, been deployed widely by Google, and there is now SPDY support for Apache through the mod_spdy module.
SPDY's design should help performance on mobile networks, which experience high round-trip times and typically lower throughput than to wired networks. SPDY includes several features that should improve web page download speeds on mobile networks, including:
- Header compression, which eliminates redundant data for HTTP headers;
- Out-of-order request processing, avoiding head-of-line blocking for HTTP responses;
- Use of a single TCP connection for multiple requests, eliminating overheads for TCP connection establishment (which can be high on mobile networks).
The net result is that using SPDY results in a mean page load time improvement of 23% across these sites, compared to HTTP. This is equivalent to a speedup of 1.3x for SPDY over HTTP. Much more work can be done to improve SPDY performance on 3G and 4G cellular networks, but this is a promising start. More details below.
Methodology
Our goal was to evaluate how SPDY performs on a real browser on a real phone when fetching popular websites. The challenge was in mitigating the variability across experiments.- Phone and browser configuration: We ran our experiments on Chrome for Android, because it has an up-to-date draft 2 implementation of SPDY and is the only mobile browser we know of that supports SPDY. We ran the browser on Android 4.0 (Ice Cream Sandwich) on a Samsung Galaxy Nexus phone. We used Chrome's remote debugging interface with a custom client that starts up the browser on the phone, clears its cache and other state, initiates a web page load, and receives the Chrome developer tools messages to determine the page load times and other performance metrics.
- Pages measured: We selected 77 URLs from a selection of 31 popular websites, to ensure a broad cross-section of both front pages and article pages across different types of sites. To ensure that the phone retrieved the same content each time it fetched a particular URL, we captured and replayed this content using the Web Page Replay tool, which eliminates the nondeterminism associated with replaying web page loads. All content was cached on our Web Page Replay server.
- Server configuration: We needed a Web server implementation that supports SPDY. The best SPDY implementation available to us is Googles internal web server, called the Google Front End (or GFE). The GFE was configured to proxy to the Web Page Replay server hosting the actual site content. The GFE and the Web Page Replay servers ran on separate Linux desktop machines on the same LAN segment. All Web page contents were stored on the Web Page Replay servers local disk to eliminate additional sources of latency. The phones' /etc/hosts file was modified to return the GFE machine's IP address for all domain lookups, essentially isolating the phone and the desktop from the Internet. As a result, our measurements do not include realistic DNS lookup times.
- Consistent network conditions: In prior experiments, we found page load times to be highly variable over real 3G and 4G cellular networks, making it hard to draw conclusions without running hundreds of experiments per site in order to estimate the statistical distribution. To reduce this variability, the phone was tethered to the desktop machine hosting the server using a USB connection, and traffic shaping was applied to the tethered connection using Dummynet. We emulated a 3G network with uplink bandwidth of 1 Mbps, downlink bandwidth of 2 Mbps, and a round-trip delay of 150 ms. These values were chosen as representative of cellular network performance in the United States. Note that packet loss was not included in the traffic shaping parameters, since cellular networks hide packet loss at the PHY layer, and our previous experiments have shown a TCP-level packet loss of less than 1% over typical cellular networks.
- Data collection: For each page load, we recorded the page load time reported by the browser, as well as the detailed trace of Chrome remote debugging messages which were used to reconstruct a load time waterfall for each page, including the time to load each individual resource on the page, as well as timings for TCP connections, DNS lookups, and redirects. In addition, tcpdump was run on the phone to capture a trace of all network packets sent and received during the web page load.
We ran two sets of experiments:
- SPDY: Fetch the 77 URLs through the GFE using SPDY.
- HTTP: Fetch the 77 URLs through the GFE using HTTP.
Table 1: Domains included in the Web page measurements
| bbc.co.uk | bloomberg.com | cricinfo.com |
| decor8blog.com | digg.com | droid-life.com |
| economictimes.com | espncricinfo.com | flickr.com |
| greenweddingshoes.com | huffingtonpost.com | ibtimes.com |
| imgur.com | michaeleisen.org | microsoft.com |
| nlm.nih.gov | qq.com | quickmeme.com |
| reddit.com | reuters.com | sciencemag.org |
| seattletimes.nwsource.com | slashdot.org | sohu.com |
| theboombox.com | timesofindia.com | wikipedia.org |
| windowsteamblog.com | wired.com | yomiuri.co.jp |
Results
Figure 2 shows the page load time for each of the 77 URLs using both HTTP and SPDY. As the figure shows, in all but one case, SPDY is faster than HTTP, with an average page load time reduction of 23% across all pages. For one of the URLs (an article from huffingtonpost.com), the page loaded 6% slower on SPDY than HTTP.Figure 2: Comparison of SPDY vs. HTTP page load times
Figure 3 shows the average SPDY load time reduction for each of the measured pages. The load time reduction is calculated as (SPDY load time) / (HTTP load time) for each page.
Figure 3: Page load time reduction for SPDY for each of the measured sites
In order to take a closer look at SPDY's performance, Figures 4 and 5 show the waterfall chart for SPDY and HTTP (respectively) for one of the pages.
Figure 4: SPDY load waterfall for http://en.m.wikipedia.org/wiki/Harvard_University
Figure 5: HTTP load waterfall for http://en.m.wikipedia.org/wiki/Harvard_University
The waterfall diagrams clearly show SPDY's main advantage over HTTP: The use of out-of-order responses. In the SPDY case, the browser opens a number of SPDY streams (over the same TCP connection) to fetch the various resources on the page, whereas in HTTP, each of the resources are fetched across several (6 in this case) TCP connections, with each connection handling requests in a FIFO fashion. Note that there are several 404 Not Found errors in both traces, owing to the Web Page Replay setup not caching all of the resources on the page.
Conclusions
SPDY shows promise to improve the performance of web page load times over mobile networks. Of course, its necessary to look across many more sites and a wider range of network conditions, but in this controlled experiment we find that SPDY yields a mean page load time reduction of 23% over HTTP, yielding a speedup of 1.3x. Website operators should consider using SPDY to speed up access to their sites from mobile devices.9.UI messaging and perceived latency
To the typical user, speed doesn't only mean performance.
Users' perception of your site's speed is heavily influenced by their
overall experience, including how efficiently they can get what they
want out of your site and how responsive your site feels.
When designing your website or web app, keep in mind that users come to your site with a purpose. The faster (and easier) they can accomplish what they came to do, the better. If users encounter a lot of difficulty in getting to your content, they will leave your site for one that lets them accomplish their goals faster.
While there are there are many things you can do to save users time and make them feel that things are not as slow as they might be, this tutorial deals only with user messaging.
Let's say your site is a powerful web application with lots of features. Given that it's not an easy task to design a completely intuitive out-of-the-box experience for this type of application, your users may need a bit of help getting started.
A first-run experience that concisely explains or shows the user what the product is and/or how to use it is extremely valuable. A little bit of time spent upfront in learning a few key things about your product can save a user a lot of time in the long run.
Warning: Don't go overboard! Don't block the user from getting to actual content by making the first-run experience into a cumbersome multi-step process.

Consider the case where a user wants to carry out an action that you think is pretty drastic. You think it's worth double-checking the user's intention, to save the user who got to this point by accident. So you put up a message that says "Are you sure you want to do this?" You've saved the user who was about to make a big mistake, but for the user who actually wanted to commit this action, you've now introduced an extra step into the process. Instead, you could allow the action to be committed immediately in either case and given the ability to undo it, after the fact.

If the user has to wait more than a few seconds, show a progress bar. Progress bars not only indicate that the user has to wait, but also roughly how much longer the wait will take. If you want to be more specific, you can even detail how much of the action has completed (e.g. 40kb of 64kb). Try to refrain from including the estimated time to completion because, with fluctuating connection speeds, there's nothing worse than seeing the estimated time remaining climb upwards.
 When
the user has to wait less than few seconds, show some kind of loading
indicator. Loading indicators are often manifested as variations of a
spinning doo-dad of sorts, but they can be something as simple as the
text "Loading...".
When
the user has to wait less than few seconds, show some kind of loading
indicator. Loading indicators are often manifested as variations of a
spinning doo-dad of sorts, but they can be something as simple as the
text "Loading...".
 You
might ask, why even show anything if it's just less than a few seconds?
The loading indicator gives feedback that the user's action did in fact
go through, and the site is working on it. Without any indicator, the
user is left with uncertainty about whether or not it worked and may
attempt to try again.
You
might ask, why even show anything if it's just less than a few seconds?
The loading indicator gives feedback that the user's action did in fact
go through, and the site is working on it. Without any indicator, the
user is left with uncertainty about whether or not it worked and may
attempt to try again.
When designing your website or web app, keep in mind that users come to your site with a purpose. The faster (and easier) they can accomplish what they came to do, the better. If users encounter a lot of difficulty in getting to your content, they will leave your site for one that lets them accomplish their goals faster.
While there are there are many things you can do to save users time and make them feel that things are not as slow as they might be, this tutorial deals only with user messaging.
User messaging: 3 things to think about
1. Is my site simple and intuitive enough for a person who has never seen it before to easily use the first time?
If not, take some time to design some first-run-experience messaging.Let's say your site is a powerful web application with lots of features. Given that it's not an easy task to design a completely intuitive out-of-the-box experience for this type of application, your users may need a bit of help getting started.
A first-run experience that concisely explains or shows the user what the product is and/or how to use it is extremely valuable. A little bit of time spent upfront in learning a few key things about your product can save a user a lot of time in the long run.
Warning: Don't go overboard! Don't block the user from getting to actual content by making the first-run experience into a cumbersome multi-step process.
2. Does this message interrupt or add steps to the user's workflow?
Think carefully about how messages you display may lengthen the user's workflow. There may be more appropriate times and ways to display a message that won't keep the user from getting things done.Consider the case where a user wants to carry out an action that you think is pretty drastic. You think it's worth double-checking the user's intention, to save the user who got to this point by accident. So you put up a message that says "Are you sure you want to do this?" You've saved the user who was about to make a big mistake, but for the user who actually wanted to commit this action, you've now introduced an extra step into the process. Instead, you could allow the action to be committed immediately in either case and given the ability to undo it, after the fact.
3. How can I reassure the user during wait times?
Let's face it: there are going to be times when the user has to wait. There are, however, a few things you can do to make the inevitable wait time a little more bearable.If the user has to wait more than a few seconds, show a progress bar. Progress bars not only indicate that the user has to wait, but also roughly how much longer the wait will take. If you want to be more specific, you can even detail how much of the action has completed (e.g. 40kb of 64kb). Try to refrain from including the estimated time to completion because, with fluctuating connection speeds, there's nothing worse than seeing the estimated time remaining climb upwards.
When
the user has to wait less than few seconds, show some kind of loading
indicator. Loading indicators are often manifested as variations of a
spinning doo-dad of sorts, but they can be something as simple as the
text "Loading...".You
might ask, why even show anything if it's just less than a few seconds?
The loading indicator gives feedback that the user's action did in fact
go through, and the site is working on it. Without any indicator, the
user is left with uncertainty about whether or not it worked and may
attempt to try again.Additional resources
These suggestions are only the tip of the iceberg of things you can do to design with the user in mind. For reading material on interaction design and web design principles, here is a list of books that can get you started:- About Face by Cooper, Reimann, Cronin
- Bulletproof Web Design by Dan Cederholm
- Contextual Design by Beyer and Holtzblatt
- Designing the User Interface by Ben Schneiderman and Catherine Plaisant
- Interaction Design by Jenny Preece, et al
- The Elements of User Experience by Jesse James Garrett

Thank you for sharing the tips and the knowledge in the more understandable way. This is very helpful and informative. Would love to see more.
ReplyDeleteWordpress Tips